TMNT

How I make a statue part 2.. Irma

Well I am finally done!

I hope that I had just as much fun as you did making it.  OH WAIT, I made it.  But I am sure you will have fun watching the rest of the process.  It’s much easier, or at least less than all that sanding and getting it back in the shape I need to have before I start painting her. Before I start into my prelims, let me do a bit of refresher on what I did in the previous episode…

Making statues- Part one: Irma

That’s pretty much it.  If you did not read or take a look at it yet, then head over to the link and have fun with it.  I think that it’s not only the best part of my making statues, but it’s the most creative process in the same.  Working with clay you get the freedom to create and diverse in your artwork.  To create something that you and someone else will like.  The long tedious part is the sanding, but you want to get all the lumps and bumps out to make your piece special and unique.

Now onto the final steps

Part 4- darn it I had to look up what part I was on.. 🙂

Image

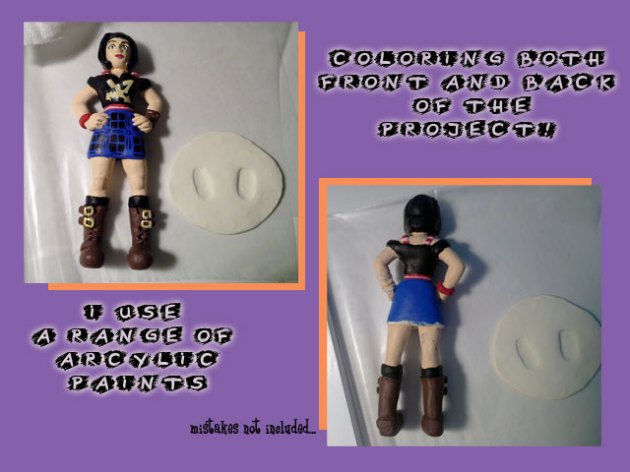
Once I have her all sanded out, I decided on a statue.  As in the earlier link or blog I had posted, I created an image that I wanted to work from but never really thought of a base, so I just casually decided on a round circle.  I never had any ideas or plans on what to make of it, but it’s something to hold her up.  I thought about what to do later and will get that in the final steps.  Hence it is white and plain.  I tried to keep it simple and unique.  I did not use a cookie cutter because not only did I not have one, but with it being a last min decision, I thought it looked nice being ragged and unique. 

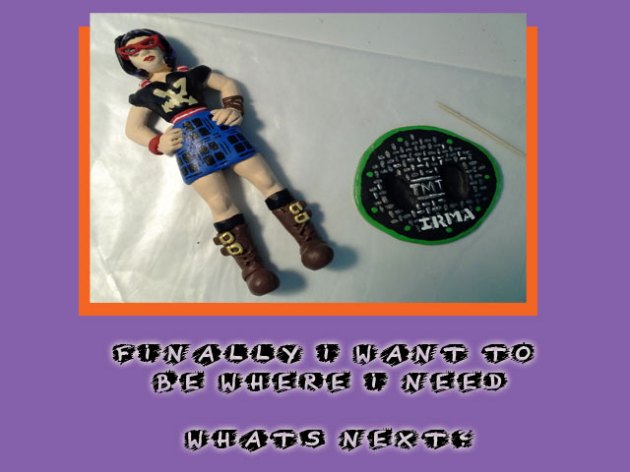
Anyway, as I worked I used basic craft paints I find at walmart, michaels, joannes, whatever had a sale.  I used satin craft paints to give it the thickness of colors used, but even the cheapest of paints worked well.  The cheapest I had to put on several coats, but that made it more formal and better cover.  Painting was very careful, esp on the finer details such as the eyes and skirt.  It became a challenge to keep up with my sketch, what I seen in images, and so on.  I did mess up here and there, but with basic acrylic paints it became an easy fix.  The only problem I have is my steady hand.  I do not have one, and even though I sanded her pretty well, the painting made up for it.  😛

Part 5

Image

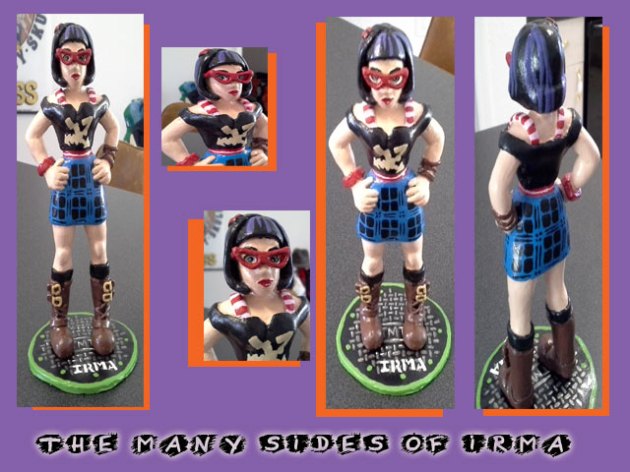
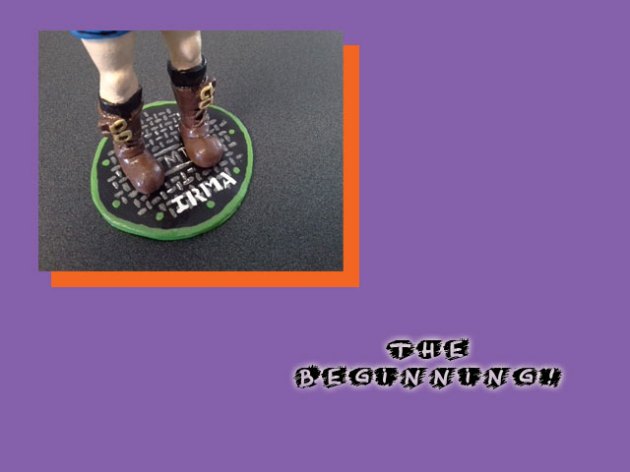
All done, with heavy concern and careful painting I had finally got done with what I wanted.  All things came together when I made the piece as a whole.  I looked at the round stand and thought.. “Hey!  That would make a great manhole cover!”  I was going to use the logo, but it was rather small with her feet so I decided to just condense TMNT to TMT.. that way it kinna looked like NYC.. as most of their manhole covers looked in the series.  Then I painted her name.  The final piece really looked good. 

I also had to repaint her glasses as I glued it to her head.  it was so fragile that I had to fix and repaint.  I use a great glue that’s a gel from Elmers.  I won’t use any other kind.

Part 6

Image

And then I used it to glue her to the base.  It all worked well together!

FINALLY..

Image

The end or the beginning?  you decide!  I am making more statues as we speak, and she is up for sale.  I had someone ask me.. “why are you selling your work?  You should keep it!”  I love my work.. but I want to share it more.  It’s what we artists want.. to share and to get our work out there and to make a bit of money on the side so we can do this for our lives.  I love to share my artwork, get it out there and do what I LOVE TO DO!!  It’s a start and I hope that I can generate an audience who would not only love to purchase my work, but to share it as well.  I love art. I do all kinds!  If it’s a media, I am willing to learn it and to make people happy.  I am with this and I Hope I made you just as happy by reading it!

She is for sale on ebay:

http://www.ebay.com/itm/261448739277?ssPageName=STRK:MESELX:IT&_trksid=p3984.m1555.l2649

IF interested.. bid.  If not, please spread the word around for those you know who would love to have her.  she is limited and as you see here, very original.  Nothing duplicated nor a mold.  She is great for your collection and it will help me gear into making more!

Thanks for watching!
Making statues- Part one: Irma

One often asks me, how do I make my statues and why not make molds?  Well, I have considered molds, but well.. when I create a statue, I make it a one of a kind piece, putting a lot of dedication into it even if I do it over and over again.  That way, whoever buys or offers a statue from me will get a one of a kind that no one else will have. 

It really does not take too long to make a statue.  I range from at least one to two months depending on how hectic my outside life can be.  Considering my life and the job I keep as well as my family (thank God I do not have kids because I just would not  the mother I would like to be due to all my hard time on myself), I just try my best to find the best time I can give myself and my work.  I enjoy making statues so I will not press the issue on how hard it is or how much it takes out of me.  If anything, it relaxes me on everything out there that I do not really like. 

Image

Step 1.

Let’s get to the heart of the matter.  How do I create a statue, part one.  I put this in parts because I am still working on this piece I hope to sell on Ebay soon.  First off I look up ref photos and try to get what I want accomplished by not copying or taking too much from the photo due to copyrights.  I know that I am pretty much breaking down the barrier by taking the photos and looking at it, but I still want to say.. hey, this is my piece.  My art.  So I look for the refs, but I still accomplish my art style into the work I create.  So within the steps I draw and try to come up with what I want and how I want the statue to look.  So I create my own drawing and wa.. lah, I am onto the wireframe.

NO!  The whole statue is not made of clay.  It would be too much on my product,  too heavy, and way too much in the matter.  Besides with the bone structure, I can get what I want in balance and completeness.  So with aluminum wire and foils I come up with something thesibile to my sketch.  Thesibile?  is that a word?  OH Well..

Image

Step 2.  Clay time

Okay, now that that is out of the way, I am now ready to put in the clay.  I prefer to work with Sculpey clay because it is fun and flexible.  If I have to have a back up it would be stradler, but they do not really make too much clay to work from that I find fun, unless I do my ball joint dolls.  But that is for a later journal.  I love this clay.  It’s plastic all and all.. I have a bad habit of chewing my nails so I love this clay.  It helps keep my fingers out of my mouth.  Anyway, I love the shape and form of polymer clay.  I can bend and flex it to what I would like to have and want.  Originally I used basic tools to make my statues and they became too bulky and not so much fleshed out, but then I found nice tools that I will post later, from Hobby Lobby and I tell you, they are a God send!  They help me focus on my details and not ruin so much of my statue.  The only thing I have been doing wrong or making it hard as I create statues is that I do not use an armature stand.  I do have one, but I just do not want to waste my bits on my mini statues.  I will in the future, but it is not hard for me to lay my stand ups and when I bake them.. yeah, they flatten a bit, but it won’t take much out when I sand them.

I will post all I am talking about in future posts, ie tools and flat clay. 🙂

Image

Part 3. FINISHED?

Okay, so I am not finished, but I am getting there.  I am finished for this piece in sculpting.  I have finally baked it in my basic oven.  WOW.  I remember the day when you had to have a kiln and you had to bake them there.  What a world now that we can do this!  Probably why I did not pursue sculpture.  I just did not think I could do it without the right tools, but now you can find the clay at Walmart and tools at Hobby Lobby, Why not?  Anyone can do this!  Again, this process only takes me a few days.  It is not too hard putting a frame together and to slap clay.  That was the easiest of all, believe it or not.  At least for me it is.  I am such a perfectionist that I have to make sure everything is in the right place.  Eyes, nose, smoothing, arms..  So I now get done and bake in the oven.

Then comes the hard part.  The sanding!  This is what takes me the longest.  I try to get the kinks out in the clay but it’s not always easy so when I get to the sanding, I am with my dremel 7200 sander.  I have the cheaper one because you do not need a heavy duty sander heavy in your hands while you are trying to clean up the details.  It is a very nice tool and glad I invested in it.  Sure, I use sand paper as well, but the dremel makes it more easier to get into the cracks and get every bit cleaned and right.. ready to paint!

That’s it for part 1 of my sculpting!  I hope you enjoy and never give up your dream.  More later!!